FAQ
Why the name pyKNEEr?
What terminal?
How do I set the environmental variables for elastix?
How do I choose the number of cores?
How do I determine knee laterality?
What is Jupyter notebook and how does it work?
How do I launch Jupyter notebook?
How do I run a Jupyter notebook?
How do I save a Jupyter notebook?
What is a virtual environment?
How do I create a virtual environment?
How do I update pyKNEEr?
What is ITK-SNAP?
How do I compare 3D images in ITK-SNAP?
How do I visualize a segmentation in ITK-SNAP?
How do run subsequent analysis?
Issues?
How do I cite pyKNEEr?
Why the name pyKNEEr?
py is for python, KNEE is for femoral knee cartilage, and r is for reproducibility
It is pronounced like pioneer without the o
What terminal?
MacOS: Open the terminal: Applications \(\rightarrow\) Utilities \(\rightarrow\) Terminal
Windows: Open the Anaconda prompt: Start Menu \(\rightarrow\) Anaconda \(\rightarrow\) Anaconda Prompt
How do I set the environmental variables for elastix?
The instructions below are modified from the elastix manual
Look for the location of pyKNEEr on your computer. Open your terminal and type:
pip show pykneer
Look for the path in Location. In the following, we will call this path
<location>(e.g.<location>=/anaconda3/lib/python3.7/site-packages)
Linux:
elastix is in the folder
<location>/Linux/To add elastix to the environmental variables of your computer, go to terminal and type:
cd #go to your home directory
nano .bash_profile #create (or open if already existing) your profile file
export PATH=<location>/Linux/:$PATH #substitute <location> with your `<location>/Linux/`
export LD_LIBRARY_PATH=<location>/Linux/:$LD_LIBRARY_PATH #substitute <location> with your <location>/Linux/
Make sure you substitute
with your <location>/Linux/in both commands. These two lines add the elastix path to the environmental variables of your computerSave changes and close file by pressing:
ctrl+oenterctrl+x
Activate changes by typing:
source .bash_profile
Windows:
elastix is in the folder <location>/Windows/
To add elastix to the environmental variables of your computer:
Go to the control panel
Go to
SystemGo to
Advanced system settingsClick
Environmental variablesAdd the folder
<location>/Windows/(using your own location ) to the variablepath
How do I choose the number of cores?
MacOS: Open your terminal and type:
sysctl hw.physicalcpu hw.logicalcpu
You will get something like this:
hw.physicalcpu: 2
hw.logicalcpu: 4
In this example, this Mac has 2 physical (harware) cores and 4 logical (virtual) cores - for every physical core there are two logical cores.
It is recommended not to use all your cores, so you can keep using your laptop while pyKNEEr is computing. For example, if your Mac has 4 logical core, you can use 3 for pyKNEEr
Windows: coming soon!
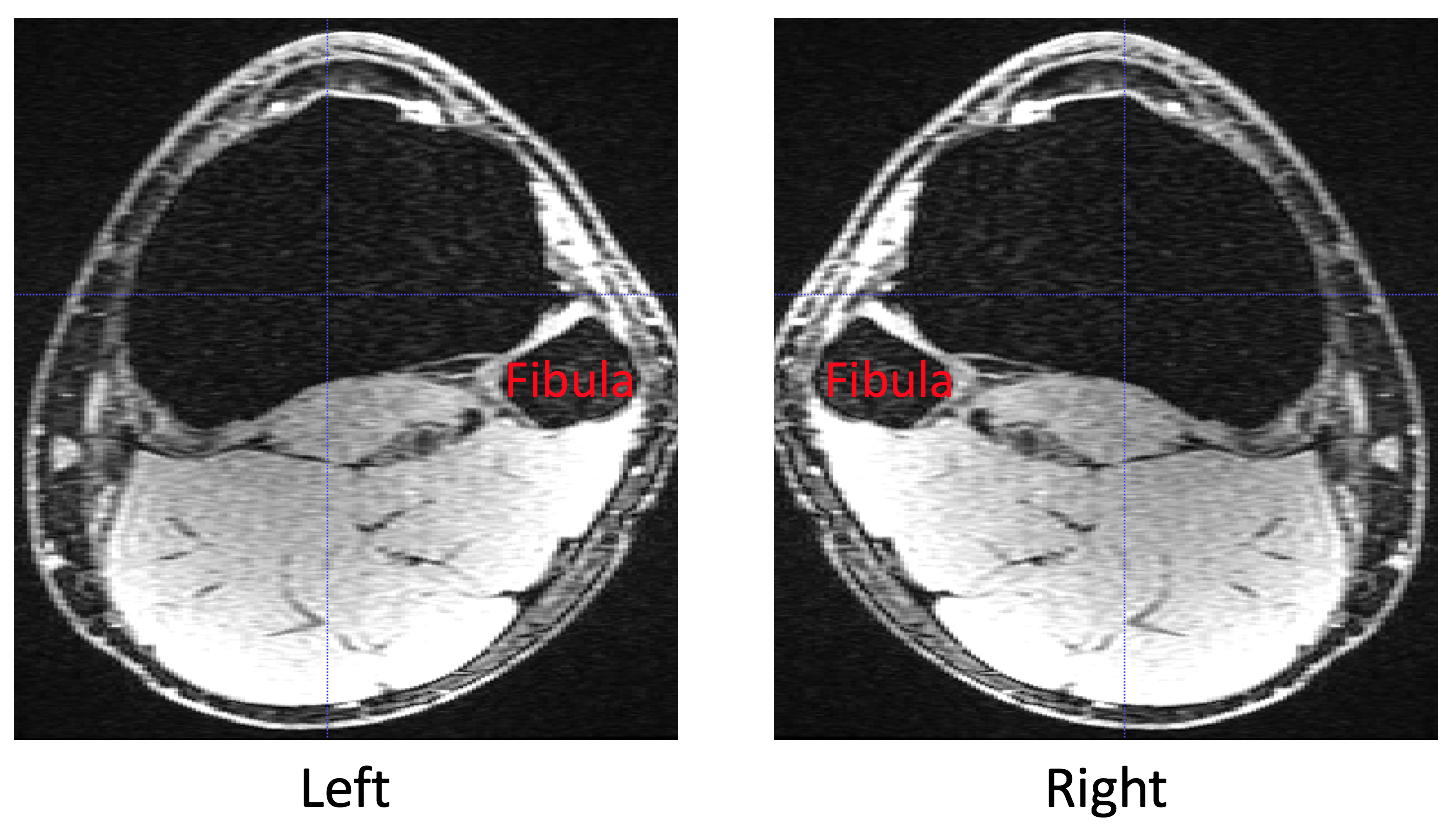
How do I determine knee laterality?
A practical way to determine knee laterality in pyKNEEr coordinate system is by considering the position of the fibula next to the tibia:
If the fibula is on the right side of the tibia, the knee laterality is left
If the fibula is on the left side of the tibia, the knee laterality is right
What is Jupyter notebook and how does it work?
Jupyter notebook is a web application that allows you to create documents that include narrative, code, and visualizations. For a quick introduction watch these videos
How do I run a Jupyter notebook?
Click in the cell, and then:
MacOS: press
return+shiftWindows: press
enter+shift
How do I save a Jupyter notebook?
You can save the notebook as:
.ipynb: File \(\rightarrow\) Save Notebook As
Text, cells, and output will be editable.html,.pdf, etc.: File \(\rightarrow\) Export Notebook As
Text, cells, and outputs will not be editable
What is a virtual environment?
A virtual environment is like an uncontaminated island on your computer that contains the code of your current project. It allows you to avoid conflicts among projects that could be due to different versions of packages and dependences, and thus implies less issues when running code. Creating a virtual environment is not compulsory, but highly recommended
How do I create a virtual environment?
MacOS: Open the terminal: Applications \(\rightarrow\) Utilities \(\rightarrow\) Terminal
Windows: Open the Anaconda prompt: Start Menu \(\rightarrow\) Anaconda \(\rightarrow\) Anaconda Prompt
Type the following commands:
  # install the package to create virtual environments
    conda install virtualenv

  # go to your chosen folder
  # MacOS:
    cd /Users/.../yourFolder
  # Windows:
    cd C:\...\yourFolder

  # create the virtual environment
    virtualenv yourFolder

  # activate the virtual environment
  # MacOS:
    source yourFolder/bin/activate
  # Windows
    - go to the folder: C:\...\yourFolder\
    - double-click on activate.bat
How do I update pyKNEEr?
To update to the latest version of pyKNEEr, go to terminal and type:
pip install pykneer --upgrade
To check the new version number, type:
pip show pykneer
What is ITK-SNAP?
ITK-SNAP is a software for image processing that has an excellent interface to visualize segmented images. All the images and masks created in this framework are in metafile format (.mha), and they can be easily visualized with ITK-SNAP.
You can download the latest release here
How do I compare 3D images in ITK-SNAP?
Open ITK-SNAP and load:
The original image: Go to
File\(\rightarrow\)Open Main Image, and select your image*_orig.mha(you can also drag and drop the image)The preprocessed imaged: Go to
File\(`\rightarrow\)Add another image, and select the corresponding image*_prep.mha(you can also drag and drop the image, and clickLoad as additional image)
To visualize the two images next to each other, toggle to tiled layout by clicking the middle icon in the top-right side of the viewer.
How do I visualize a segmentation in ITK-SNAP?
Open ITK-SNAP and load:
The original image: Go to
File\(\rightarrow\)Open Main Imageand select*_prep.mha(you can also drag and drop the image)The cartilage mask: Go to
Segmentation\(\rightarrow\)Open Segmentationand select*_prep_fc.mha(you can also drag and drop the image, and clickLoad as segmentation).
How do run subsequent analysis?
You can find examples of subsequent analysis in our paper (see Fig. 4)
How do I cite pyKNEEr?
You can cite paper, code, and data:
Paper : Bonaretti S., Gold G., Beaupre G. pyKNEEr: An image analysis workflow for open and reproducible research on femoral knee cartilage. PLOS ONE 15(1): e0226501
Code : Bonaretti S. pyKNEEr. Zenodo. 2019. 10.5281/zenodo.2574171

Data: Dataset in (Bonaretti S. et al. 2019). Zenodo. 10.5281/zenodo.2583184
